
1. Introduction
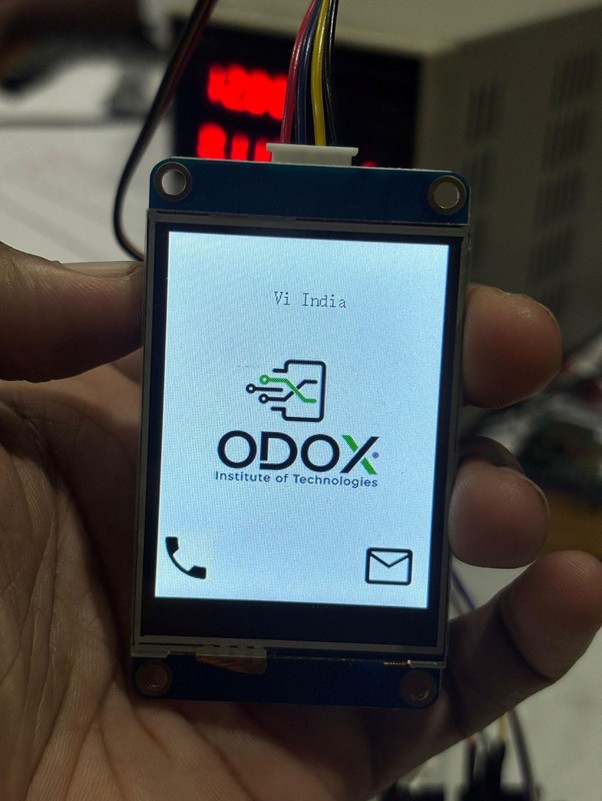
The OCU (Odox Cell Phone Unit) is a GSM-based communication unit designed using an Arduino microcontroller, a Nextion Display, and a GSM Module. This project demonstrates the integration of these components to create a functional interface capable of making and receiving calls through a user-friendly graphical interface on the Nextion Display.
2. Objective
To design and implement a compact and efficient mobile communication unit using Arduino, GSM module, and Nextion display, capable of displaying call status and performing basic telecommunication functions.
3. Components Required
- Arduino board
- GSM Module (SIM900A or compatible)
- Nextion Display
- 12V Power Supply for GSM module
- Connecting wires and jumper cables
- SIM card
- Memory card (for TFT file upload)
4. Circuit Connections
Wiring Connections
ComponentConnectionArduino Pin / Port
Nextion +5V→Arduino VDD_5V
Nextion RX→Arduino Pin 11
Nextion TX→Arduino Pin 10
Nextion GND→Arduino GND
GSM RX→Arduino Pin 1 (TX)
GSM TX→Arduino Pin 0 (RX)
GSM GND→Arduino GND
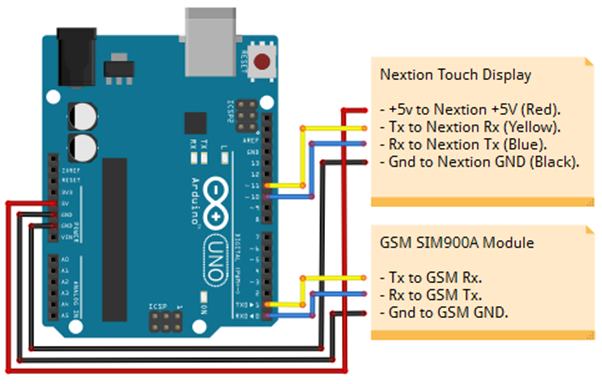
⚡ Power Supply:
Connect the GSM module to a 12V power supply. The Arduino board can be powered through the GSM module.
💡 SIM Installation: Insert a SIM card into the GSM module before powering on the circuit.
5. Software Setup
Step 1: Arduino Program
- Copy the provided Arduino sketch into a new project in the Arduino IDE.
- Compile and upload the program to the Arduino board.
- Ensure the correct COM port and board type are selected before uploading.
Step 2: Nextion Display GUI
- Open the provided HMI file using Nextion Editor.
- Design or modify the GUI as desired.
- Export the GUI as a TFT file.
6. Uploading the TFT File to Nextion Display
Option 1: Using SD Card
- Format a memory card in FAT32 format.
- Copy the exported TFT file onto the memory card.
- Insert the memory card into the Nextion Display’s microSD slot.
- Power on the display – it will automatically upload the TFT file.
- After completion, power off the display and remove the SD card.
- Power on again – the new GUI will appear on the screen.
7. Hardware Assembly Steps
- Assemble the circuit according to the wiring diagram provided.
- Insert a SIM card into the GSM module.
- Connect the 12V power supply to the GSM module.
- Power on the system – the OCU is now ready for use.
8. Operation
- Upon powering up, the Nextion Display will show the custom GUI.
- The GSM module will initialize and register on the network.
- You can now make or receive calls using the OCU interface.
9. Conclusion
The OCU – Odox Cell Phone Unit successfully integrates Arduino, GSM, and Nextion display technologies to create a working mobile communication interface. This project demonstrates practical implementation of serial communication, embedded interfacing, and graphical UI development for GSM-based applications.
Source code:
here you can find the full source code with documentation, schematics, ino file, HMI file and tft file:
https://github.com/gsmanees/OCU_Odox_Cellphone_Unit